Introduction
The People First API is a collection of smaller APIs that fall into three distinct API categories, namely:
Within those categories, the APIs are further broken down into a set of context specific areas, e.g. 'hrm', 'talent', learning, recruitment. There is also a 'global' context that provides entry points and resources that aggregate data from multiple contexts.
API Requests
People First API requests are made to one of a number of RESTful endpoints. All API requests need to provide, as a minimum, the organisation's tenant code, environment code, and ther caller's authentication credentials. A simple HTTP request to a user's global profile endpoint might look like this:
GET /api/profile HTTP/1.1
        Host: TENANT_CODE-ENVIRONMENT_CODE.people-first.com
        Accept-Language: en-GB
        Content-Type: application/json; charset=utf-8
        TenantCode: TENANT_CODE
        EnvironmentCode: ENVIRONMENT_CODE
        Authorization: Bearer ACCESS_TOKEN
Where:
TENANT_CODEis the tenant code that was provided by MHR.ENVIRONMENT_CODEis the environment code that was provided by MHR. When accessing your default environment (typically your production environment) the -ENVIRONMENT_CODEhostname segment, andEnvironmentCodeHTTP header field can be omitted.ACCESS_TOKENis the access token supplied by your System Administrator, or ID token obtained separately (see:OIDC ID Tokens).
An example cURL command to construct the above request would be something like:
curl --location --request GET "https://tpruk-dev.people-first.com/api/profile" \
            --header "TenantCode: tpruk" \
            --header "EnvironmentCode: dev" \
            --header "Accept-Language: en-GB" \
            --header "Content-Type: application/json; charset=utf-8" \
            --header "Authorization: Bearer eyJ0eXAiOiJKVMsntWbLxWnNnRNZva2iueYc7KTFKP1Kz6Paog
Note: The URI segment:
https://TENANT_CODE-ENVIRONMENT_CODE.people-first.com is commonly
referred to as the "People First Base URI"
Authentication
People First APIs require authentication in order for an application to access them and make API
calls. An API client authenticates itself with People First by providing a valid token within the
Authorization header of each HTTP request (see: HTTP/1.1
Authentication for further details of the Authorization header).
The following types of token are supported within the Authorization header:
People First Access Token (recommended)
Access Tokens are generated in the admin area of People First by a user with a system administrator role. For details of how to do this, please see the REST API Integration section.
Depending upon the API being consumed, access tokens should be supplied within the HTTP Authorization
header using one of two HTTP authentication schemes:
Bearer Authentication (recommended)
When using the Bearer Authentication scheme the header will be in the form:
Authorization: Bearer ACCESS_TOKEN
Where:
ACCESS_TOKENis the access token supplied by your System Administrator.
Basic Authentication
When using the Basic Authentication scheme the header will be in the form:
Authorization: Basic USERNAME:ACCESS_TOKEN
Where:
USERNAME:ACCESS_TOKENis base 64 encoded.USERNAMEwill be ignored, so can be omitted. However, the : must always be included.ACCESS_TOKENis the access token supplied by your System Administrator.
OpenID Connect ID Token
An OpenID Connect (OIDC) ID token represents the identity of a People First User. They allow an application to call the People First APIs as though they were that user, inheriting whatever roles and permissions have been assigned to that user. They are only valid for a limited timespan before they need to be refreshed. Typically, ID tokens are used for one-time ad-hoc requests for data.
ID tokens are obtained from a tenant's registered identity provider and take the form of a JSON Web Token (JWT) signed by that provider. They can be requested from an identity provider by various methods, as outlined in the OpenID specifications. Usually, a JWT ID token will be captured via a browser-based flow with an actual user performing authentication.
JWTs should be supplied within the HTTP Authorization header using the HTTP Bearer authentication
scheme. A typical API request is shown below:
GET /api/v1/profile HTTP/1.1
Host: eu.peoplefirst.com
Authorization: Bearer ID_TOKEN
Where:
ID_TOKENis the ID token obtained from the tenant's registered identity provider.
REST API Integration
Overview
Applications need to be configured within the People First system before they can be granted access to the REST APIs, and an access/bearer token issued.
Application Configuration
Applications are configured using the Create Inbound Integration dialog screen. This can be accessed by pressing the + symbol against the Inbound Integration side menu item within the Settings page of the Administration App.
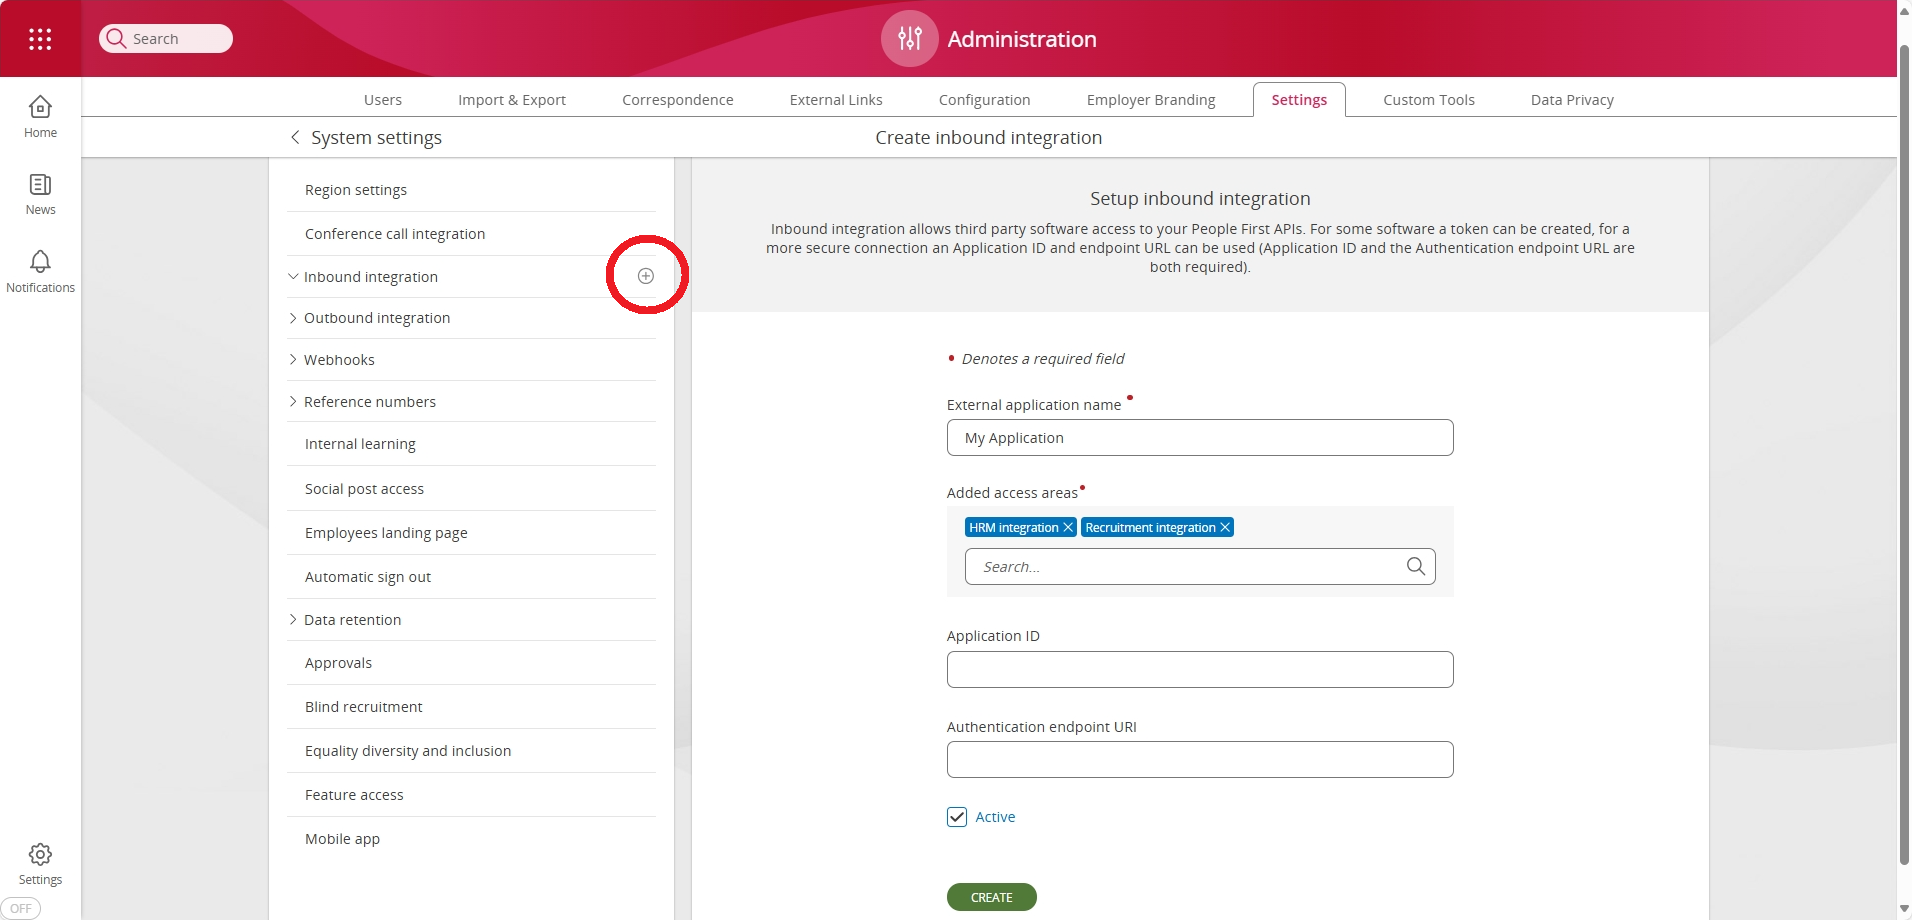
To configure an application, as a minimum, you will need to supply:
| Field name | Description |
|---|---|
| External application name | A human readable name for the application. |
| Grant user roles access to | A list of roles that are to be granted to the application - these will determine which areas of the system, and data entities can be accessed by the application. |
| Active | A flag to indicate whether the application access is active or not. |
If you are using the client credentials flow to request an access token, instead of generating one manually, you will also need to specify:
| Field name | Description |
|---|---|
| Application ID | The application ID (aka client ID) of the application within the identity provider being used. |
| Authentication endpoint URI | This is the Issuer Identifier URL for the identity provider issuing the access token. The
OIDC Provider Configuration document (see: Obtaining OpenID Provider Configuration Information) must be
available at the URL formed by appending /.well-known/openid-configuration to
this URI.
|
Access Token Generation (recommended)
The recommended method for obtaining an access token is to generate one from within the People First System Settings area. This can be achieved by pressing the Generate Access Token button in the Inbound Integration panel for the application you wish to create a token for, or by pressing the + symbol against the application name underneath the Inbound Integration side menu item.
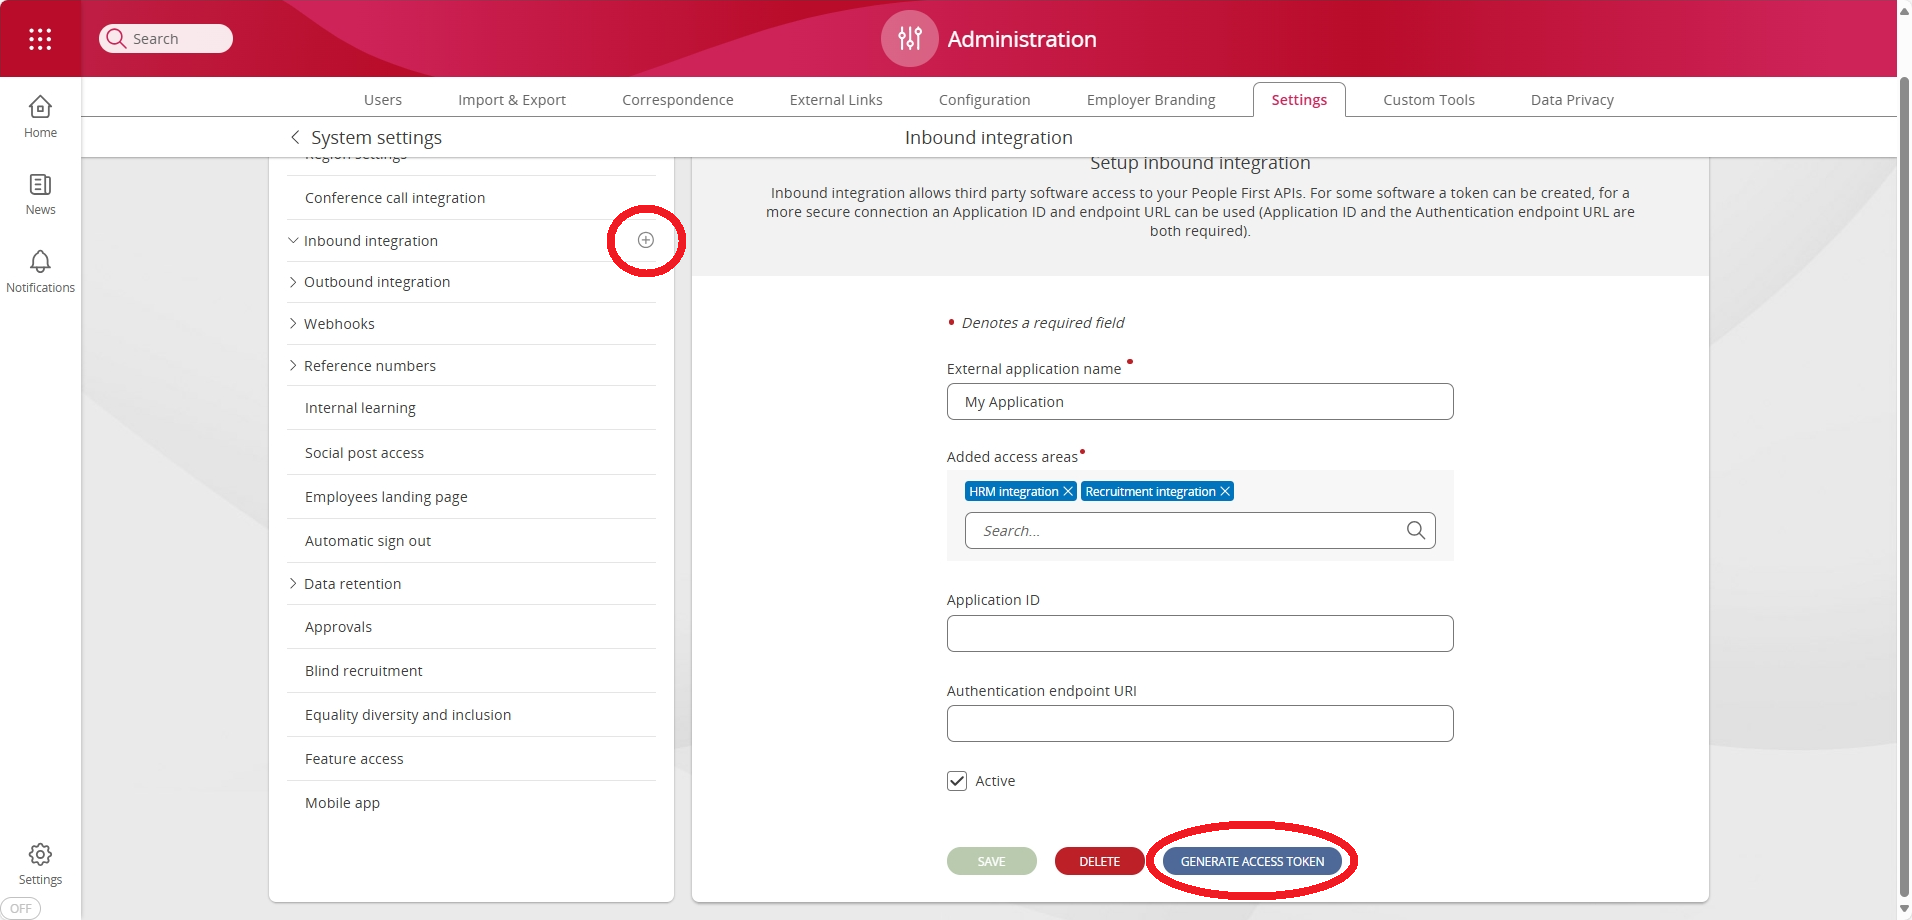
This will bring up the Generate Access Token page.
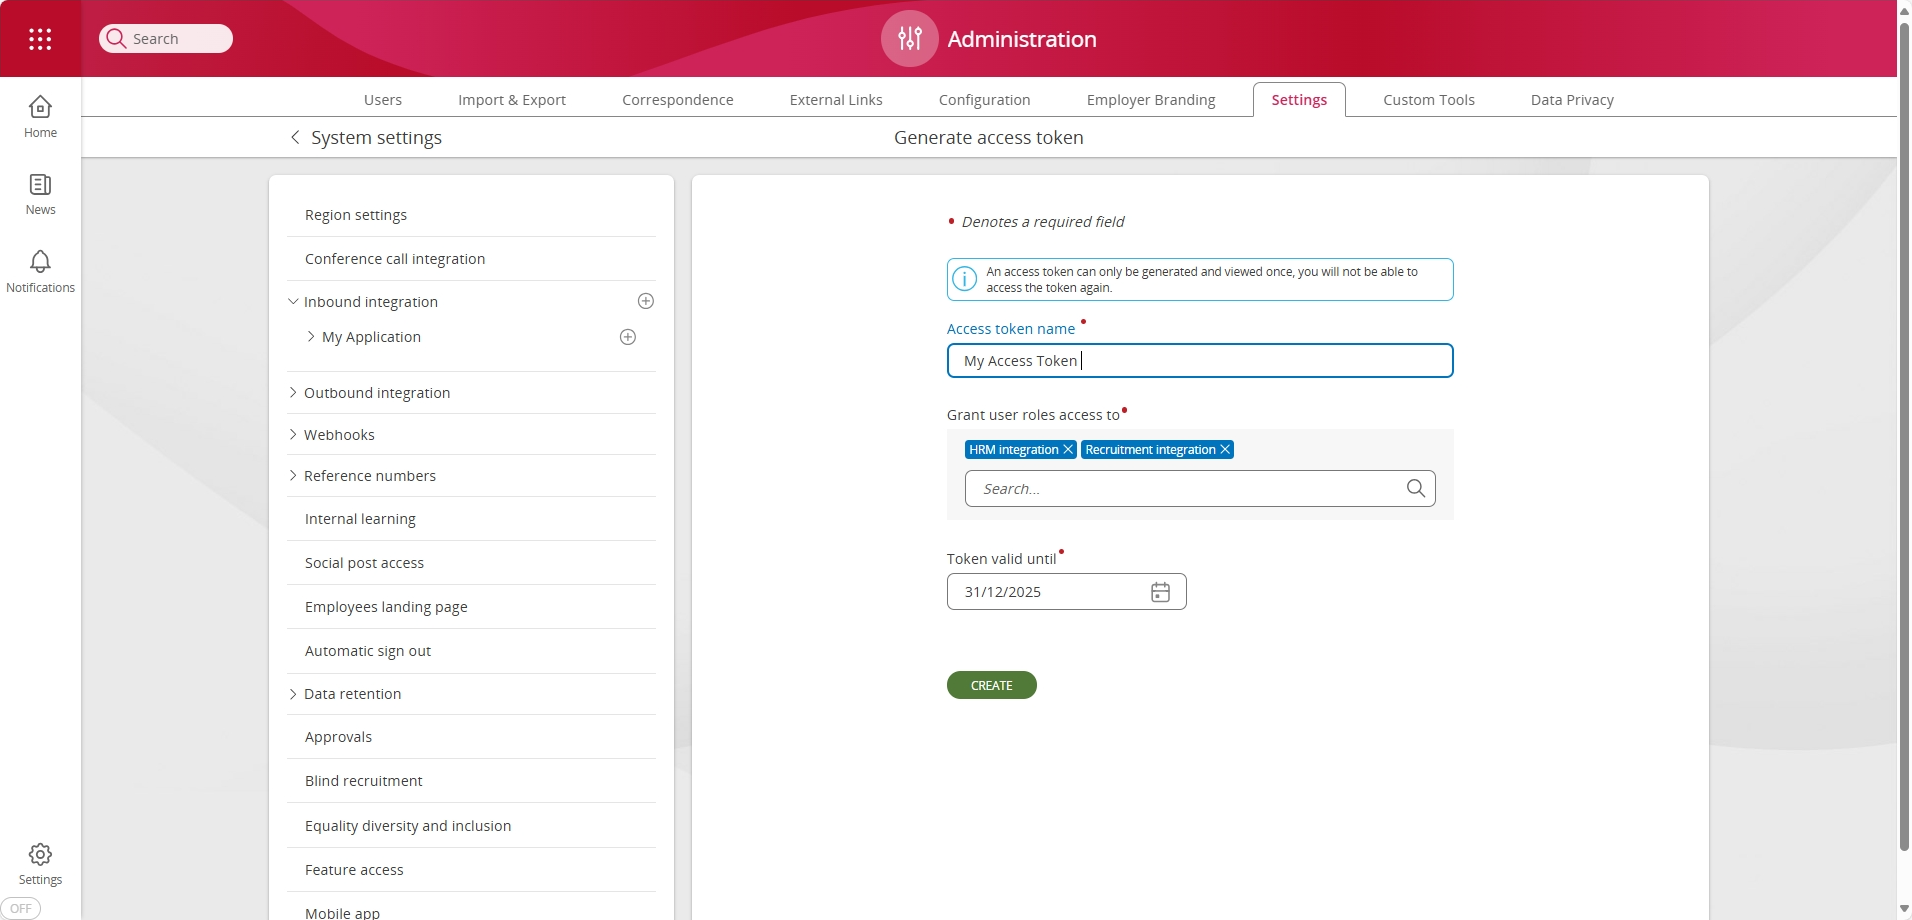
You will be required to enter the following details:
| Field name | Description |
|---|---|
| Access token name - this is a human readable name for the token being generated. | |
| Grant user roles access to | A list of roles that are to be granted to the application - these will determine which areas of the system, and data entities can be accessed by the application using this specific access token. |
| Token valid until | The access token will expire at 00:00 on this date. |
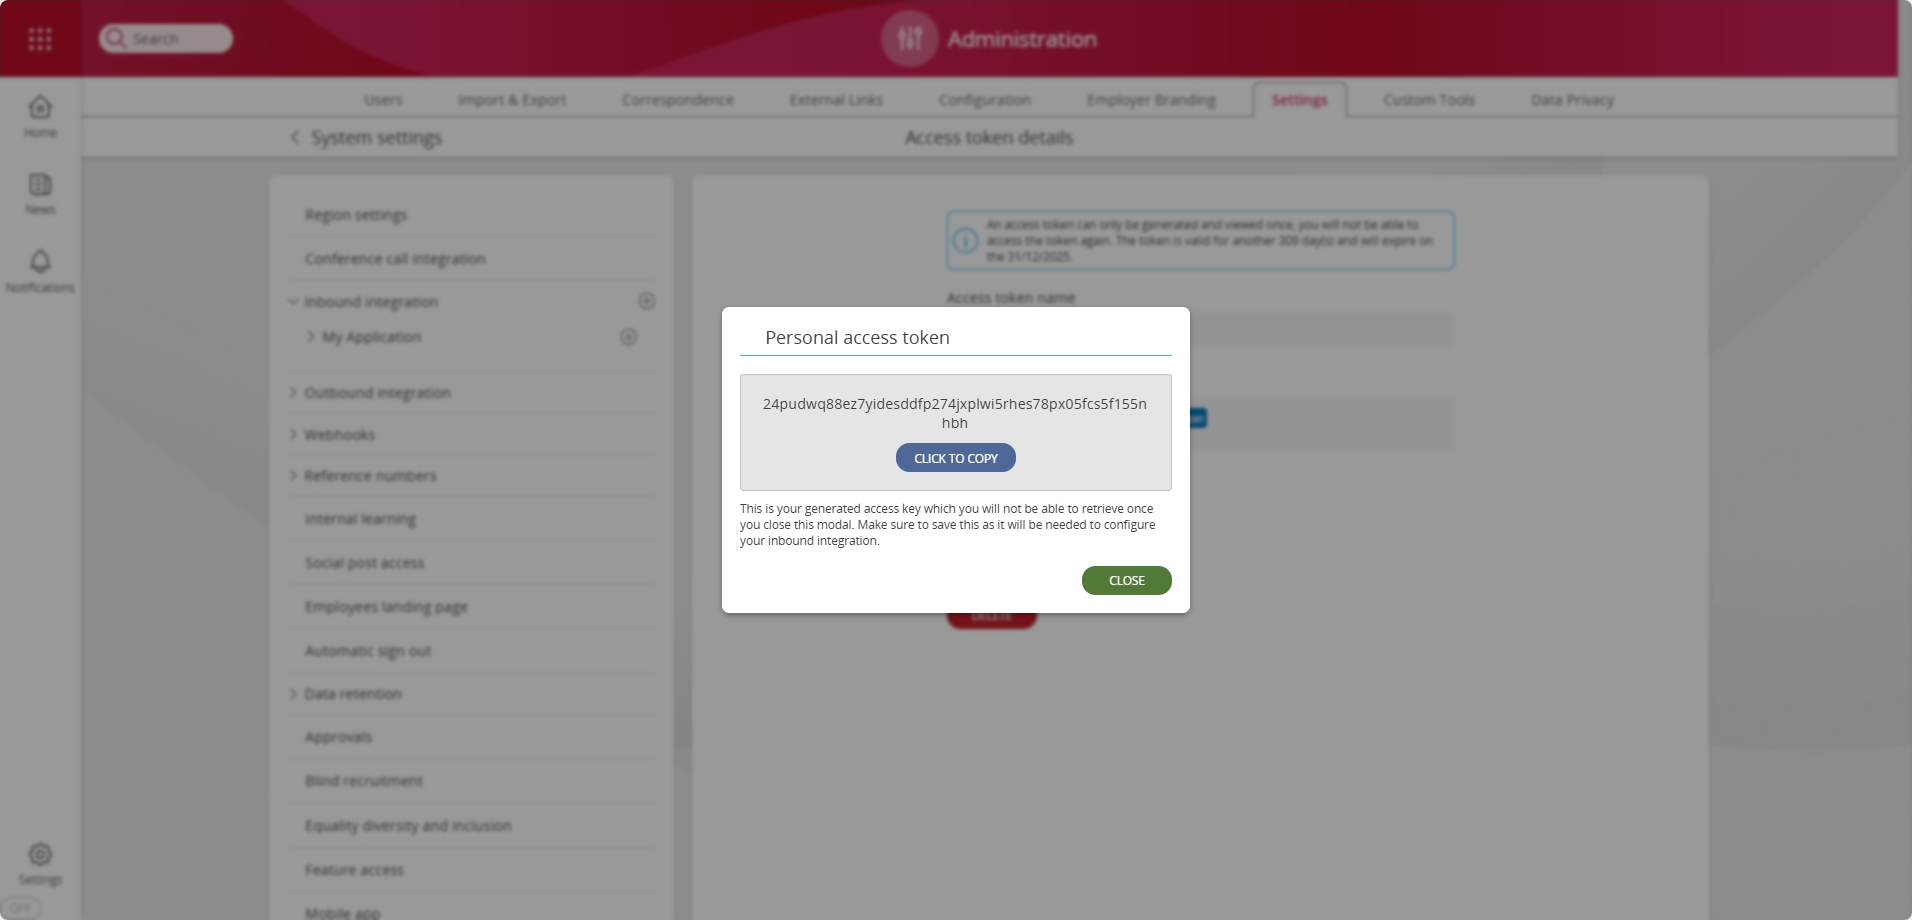
Upon selecting Create, you will be presented with a dialog displaying the generated access token. You will not be able to view the access token once this dialog has been dismissed.
Access Token Requesting
An alternative method for obtaining an access token is to request one from an authentication/authorisation server using the OAuth2 client credentials flow (see: rfc6749. This is a much more complex procedure and generally only required where a generated token cannot be supported, such as with some third-party partner integrations.
The general flow is as follows, the client makes a request to an authorization server for an access token passing a client id, a client secret and a resource. These will be provided by MHR to partners. It is the responsibility of the client to keep these credentials safe.

The client can then pass this access token to the server protecting the resource (i.e. the API) which will use the access token to allow or deny access depending on the contents of the token.
Webhook API Integration
Overview
People First can be configured to send real-time events to external systems (see: Event Stream API). This is commonly used to satisfy real time systems integration requirements. People First uses Webhook callbacks to deliver the events. Webhooks can be configured for any event type and are secured with a HMAC signature.
Configuration
Webhooks can be configured through the webhook configuration section in the administration area. To configure a new webhook, press the + symbol within the Webhook side menu item within the Settings page of the Administration App.
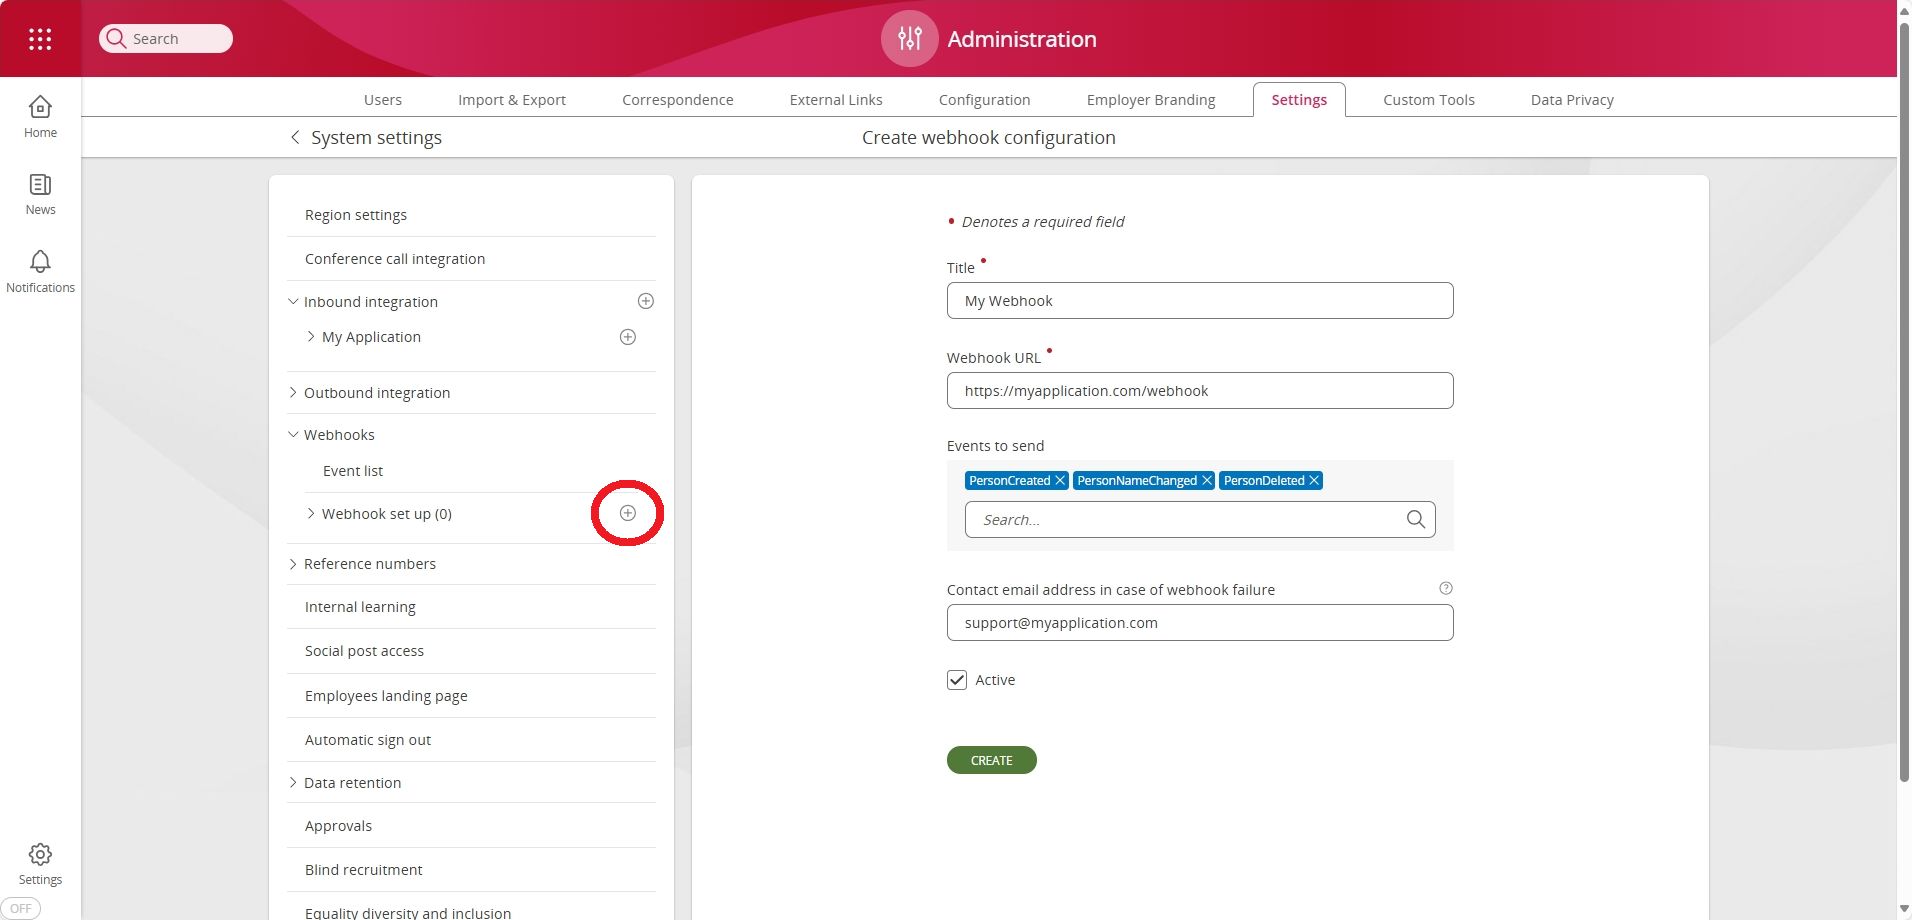
You will be required to enter the following details:
| Field name | Description |
|---|---|
| Title | A name to identify the webhook. |
| Webhook Url | HTTPS endpoint URI where the webhook calls (requests) will be POST(ed). The
endpoint must use TLS (HTTPS).
|
| Events to send | A list of events that will be sent to the webhook endpoint. The events are listed here. |
| Contact email address in case of webhook failure | If any of your webhooks report a failure, someone in your organisation is prompted. Group email addresses are permitted. |
| Active | Status of the webhook. Events will only be sent to the webhook endpoint if this is active. |
| Generate Access Key | This button is used to generate and display (one-time) the HMAC key. This key is required to verify the HMAC Signature and must be securely stored. |
Once your webhook is configured, you will need to generate an access (HMAC) key. This will enable you to verify the authenticity of the webhook messages you receive.
To do this, press the Generate Access Key button within the configuration page of your newly created webhook.
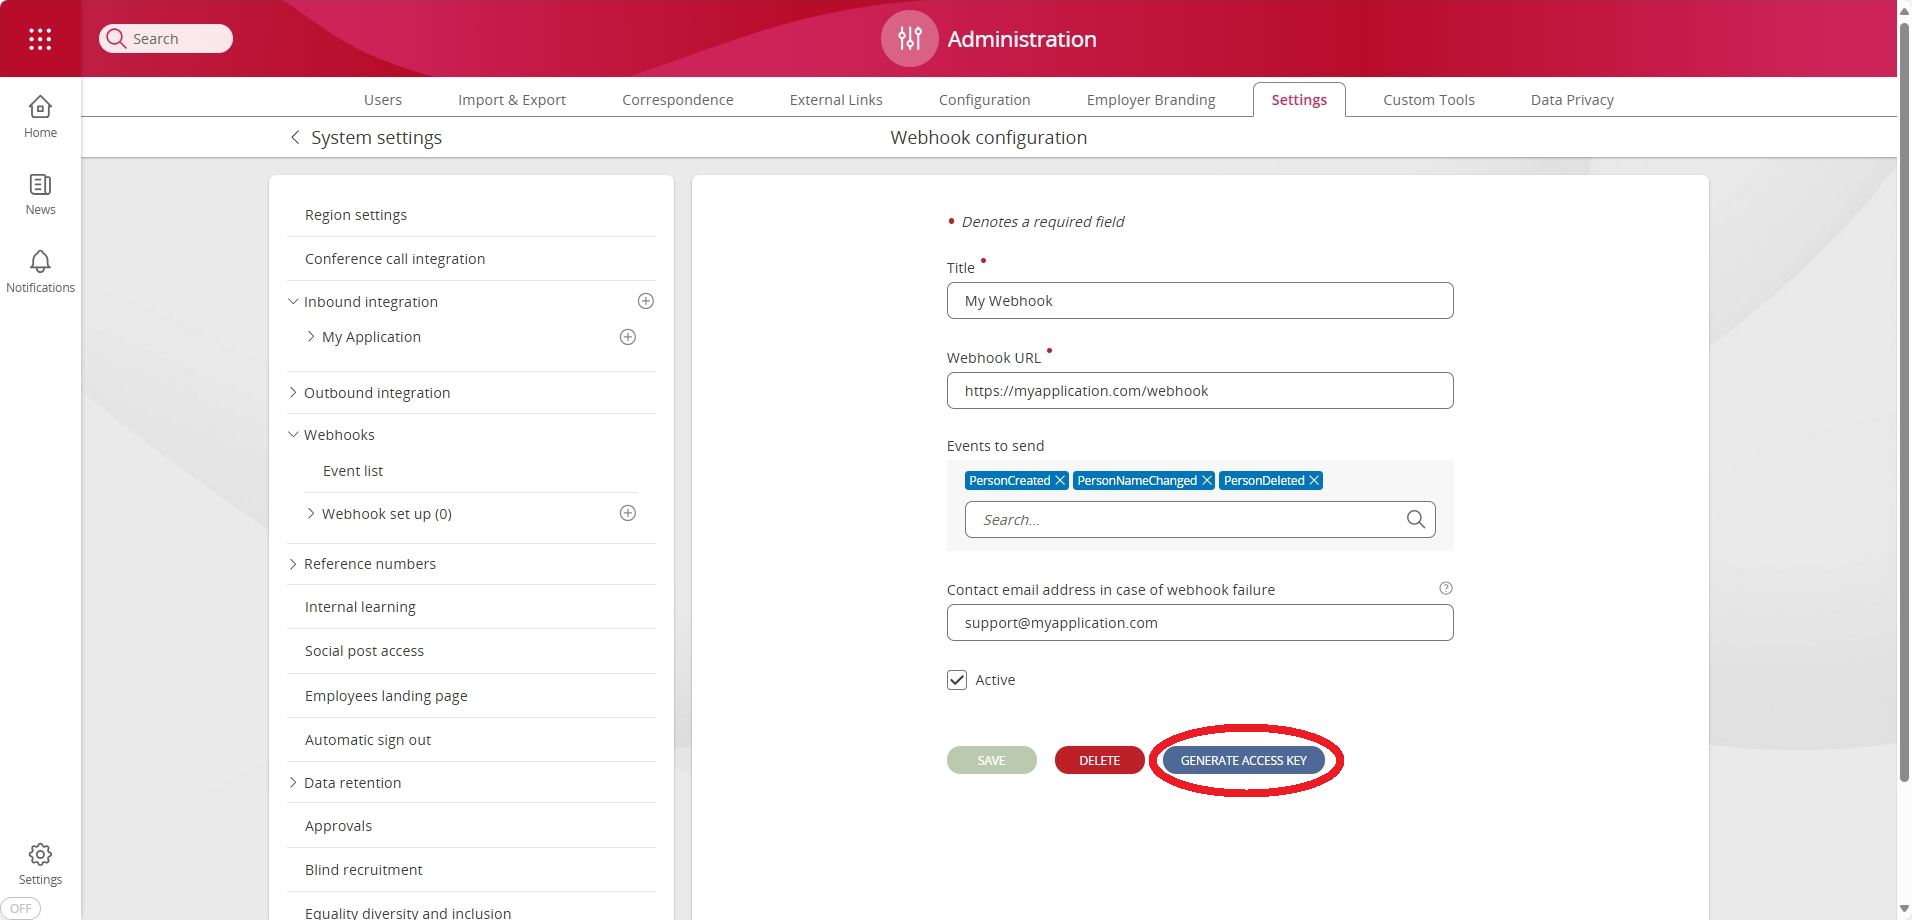
You will then be presented with a dialog displaying the generated access key. You will not be able to view the access key once this dialog has been dismissed.
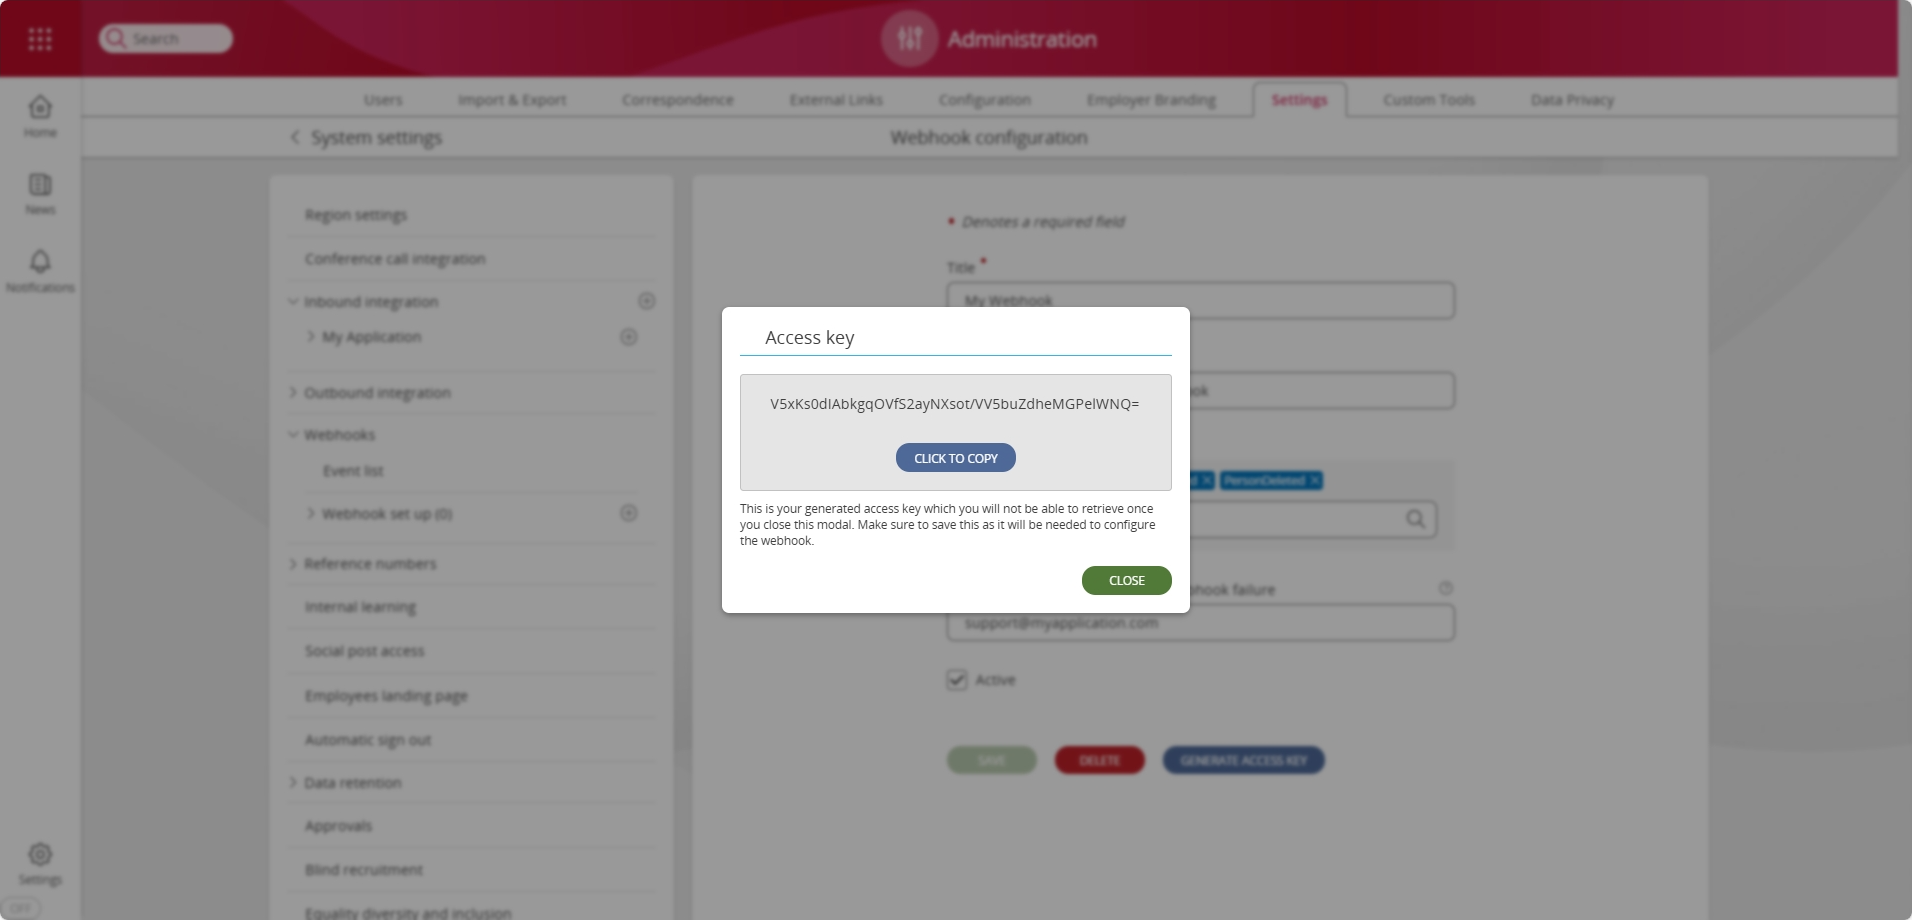
NOTE: It is imperative that the access (HMAC) key is stored securely. If it is compromised, then a malicious attacker could use the key to mimic requests that appear to originate from People First. People First will only display the HMAC key at the point of generation, after which the key is encrypted and never again surfaced over the api. If the key is lost, or there is any risk it may have been disclosed, or compromised, then a new key must be generated by pressing the "Generate Access Key" button within the configuration page of the affected webhook.
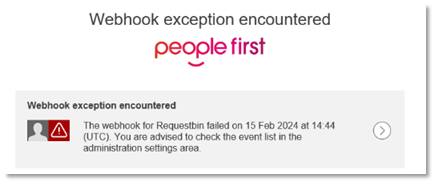
If the contact email address is updated and a problem is encountered, an email will be received that looks like this:
The event list (found in the same area) shows which webhooks ran. It shows the event name, status, date sent and the personal reference number of the person whose data was sent. A filter is available in the top right, enabling you to search for any problems.
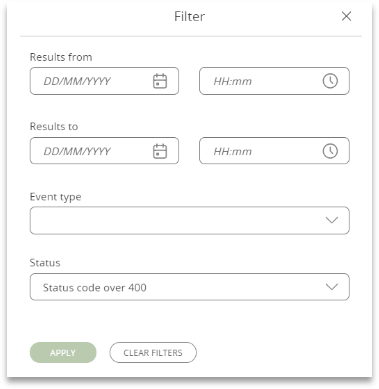
The personal reference number allows you to identify the person affected - and maybe, manually check their data. Where a serious error has been identified an error reference will be shown. Quote this when reporting the message as this will enable our staff to look at the background error report.

HMAC Signature Verification
All People First webhook request messages are digitally signed using a hash-based machine authentication code (HMAC). This allows the webhook consumer to verify that the request originated from People First and that it's content wasn't changed in transit.
All webhook requests will contain a HMAC signature. The HMAC signature is provided within the peoplefirst-signature
HTTP header of the webhook request.
In order to verify that the request is from a trusted source follow these steps:
- Base64 decode the HMAC key generated for the webhook.
- Hash the HTTP request body using the decoded HMAC key from step 1, and the HMAC-SHA256 algorithm. The body will be UTF8 encoded.
- Base64 encode the hash computed in the step 2.
- Compare the base64 encoded value computed in step 3 with the value obtained from the
peoplefirst-signatureHTTP header. - If the two values match, then the request was sent from People First and it's content hasn't been modified.
// A Postman Test that calculates the HMAC hash and verifies that it matches the supplied signature
//
// The signature has already been extracted and stored in the "peoplefirst-signature" variable.
// The HMAC key has already been stored in the "PeopleFirstEventStreamHmacKey" variable.
//
let peopleFirstSignature = pm.variables.get("peoplefirst-signature");

pm.test("verify signature", function(){

    let base64EncodedHmacKey = pm.variables.get("PeopleFirstEventStreamHmacKey");
    let decodedHmacKey = CryptoJS.enc.Base64.parse(base64EncodedHmacKey);
    let sha256signature = CryptoJS.HmacSHA256(pm.response.text(), decodedHmacKey).toString(CryptoJS.enc.Base64);

    pm.expect(sha256signature).to.eql(peopleFirstSignature);
});
  # A PowerShell script that calculates the HMAC hash and verifies that it matches the supplied signature

  $peoplefirstWebhookHmacKey = "WEBHOOK_HMAC_KEY>"
  $peoplefirstSignature = "WEBHOOK_SIGNATURE"
  $body = 'WEBHOOK_REQUEST_BODY'


  # Step 1. Base64 decode the HMAC key generated for the webhook.
  $decodedHmacKeyBytes = [System.Convert]::FromBase64String($peoplefirstWebhookHmacKey)

  # Step 2. Hash the HTTP request body using the decoded HMAC key from step 1, and the HMAC-SHA256 algorithm. The body will be UTF8 encoded.
  $hmacSha = New-Object System.Security.Cryptography.HMACSHA256
  $hmacSha.key = $decodedHmacKeyBytes
  $hashedBody = $hmacSha.ComputeHash([Text.Encoding]::UTF8.GetBytes($body))

  # Step 3. Base64 encode the hash computed in the step 2.
  $base64EncodedHashedBody = [Convert]::ToBase64String($hashedBody)

  # Step 4. Compare the base64 encoded value computed in step 3 with the value obtained from the peoplefirst-signature HTTP header.
  if ($base64EncodedHashedBody -eq $peoplefirstSignature)
  {
      Write-Host "Signatures MATCH : " -NoNewline
  }
  else
  {
      Write-Host "Signatures DO NOT MATCH : " -NoNewline
  }

  Write-Host "$base64EncodedHashedBody $peoplefirstSignature"
API Authorisation
The authorisation of API requests is governed by the assignment of one or more roles to either the application itself (if an OAuth2 client credentials flow is being used), or to the People First generated access token that the application supplies. If using an ID token then authorisation will be governed by the roles and permissions assigned to the user who granted that ID token.
The following roles are currently available:
- Custom Cards Integration
-
- Provides access to the Custom Card OData and import endpoints.
- HRM Integration
-
- Provides access to HRM import endpoints and several HRM resource endpoints (e.g. People, Unit, Job, and Occupancy related).
- IAM Integration
-
- Provides access to selected HRM Occupancy resource endpoints, and IAM resource and import endpoints.
- Learning Integration
-
- Provides access to the Learning OData endpoints.
- Recognitions Integration
-
- Provides access to the Recognitions OData endpoints.
- Recruitment Integration
-
- Provides access to the Recruitment OData endpoints.
- Socialfeed Integration
-
- Provides access to the Social Feed OData endpoints.
- Talent Integration
-
- Provides access to the Talent OData and selected resource endpoints.
- Workforce Management Integration
-
- Provides access to selected Time and Attendance resource and import endpoints.
- System Integration
-
- Provides access to the majority of People First API endpoints, including the Event Stream API.
- Custom Cards Imports
-
- Provides access to Custom Card import and export endpoints.
- HRM Imports
-
- Provides access to the HRM import endpoints
- Talent Data Imports
-
- Provides access to the Talent import endpoints.
API Compatibility Considerations
The People First APIs are under continuous development and are constantly evolving as new functionality is developed. Wherever possible, changes to the current version of an API will be made in such a way as to maintain backward compatibility with existing consumers. Where this is not possible, a new version of the API will be created and the compatibility breaking changes incorporated into it (leaving the existing version unchanged). The mechanism for working with different API versions is detailed in the API Versioning section.
As an API consumer you need to be aware of the type of changes that are considered to be backwards compatible, and code your application to handle them. This applies to all People First APIs including the Domain APIs, OData APIs, and the Event Stream API.
The following changes are considered to still maintain backward compatibility and not require a new API version:
- New resources (endpoints).
- New HTTP methods on existing resources.
- New attributes, links, or elements on existing data types within a resource.
- New optional query parameters.
- The support of new
Content-Types in the body of responses (the use of thatContent-Typehaving been indicated in the associatedAcceptrequest header).
API Versioning
People First APIs use a versioning scheme to allow clients to migrate smoothly to newer versions
when new functionality is added to the People First product. The versioning scheme is based
on an HTTP header named Api-Version. When this header is absent the request is
treated as if it is requesting version 1 of the API. For later versions of APIs the Api-Version
header must be supplied as per the example request below for a v2 API.
GET /api/v1/profile HTTP/1.1
Host: eu.peoplefirst.com
Authorization: Bearer ACCESS_TOKEN
Api-Version: 2
Where:
ACCESS_TOKENis the access token supplied by your System Administrator, or ID token obtained separately (see:OIDC ID Tokens).
Note: The "v1" portion of the URI has no impact on the version of the API requested. This portion of the URI will be removed in the future.
When an API is superseded by a new version there will be a period of time where both old and new versions are supported in parallel to allow clients time to migrate to the newer version. Deprecation of APIs will be documented on this site and will also be communicated to customers to allow them fair notice to migrate.
Where APIs are documented without a version it should be assumed the API is available as version 1. Where versions later than 1 exist these will be explicitly documented.
Entry Points
These are well-known URLs which provide a fixed starting point in the API to determine the functionality available and obtain URLs for navigation to it.
The /profile entry point is like the 'Home Page' for the people first API,
it provides information about your user, locale preferences and links into the functionality
available to you.
A profile entry point is also exposed in the Admin, Custom Cards and Talent modules e.g. /admin/profile,
providing access into the functionality specific to that area.
These endpoints answer the question 'Who am I and what can I do?' in the people first application.
Aggregations
Aggregations are provided for well-known concepts which cross API modules in order to simplify the navigation to related functionality.
| Name | Endpoint | Purpose |
|---|---|---|
| Person Profile | /personprofile/{personId} |
Provides core information and links to functionality relating to the specified person |
| Search | /search |
Exposes a search for people and departments, providing navigation into functionality related to the results |
| Search Groups | /searchgroups |
Provides all the available filters that can be applied when searching for people |
Data Types
- string: Variable length UTF-8 encoded string
- number: Number compliant with the JSON specification
- boolean: Boolean compliant with the JSON specification
- dateTime: These attributes have names appended with 'DateTime' and are ISO 8601 compliant strings which must always be UTC
- date: These attributes have names appended with 'Date' and are ISO 8601 compliant strings in the format 'YYYY-MM-DD'
- time: These attributes have name appended with 'Time' and are ISO 8601 compliant strings with no date component
Example fictional resource:
{
  "data": {
    "person": {
      "id": "031c0575-ed2e-4e04-bd01-cc7565045d8b",
      "firstName": "Susan",
      "lastName": "Smith",
      "children": 2,
      "bornDateTime": "1980-06-15T13:28:00Z",
      "employedDate": "2001-07-12",
      "startTime": "13:06:12",
      "isMarried": true,
      "_links": {
        "self": {
          "href": "people/031c0575-ed2e-4e04-bd01-cc7565045d8b"
        }
      }
    }
  }
}
Status Codes
The table below describes the possible response codes to API requests, why the code would be returned and if it would contain an error message.
| Code | Methods | Meaning | Message |
|---|---|---|---|
| 200 | GET, PUT | The request was successful (and a resource was not created or deleted) | Optional |
| 201 | POST, PUT | A request to create a resource was successful | Optional |
| 202 | POST, PUT | A request has been accepted for future processing | No |
| 204 | DELETE | A request to delete a resource was successful | No |
| 400 | All | The request was not valid, it may be missing appropriate tenant headers, or it had a malformed payload | Required |
| 401 | All | Authentication was required but was either not provided or invalid | No |
| 403 | All | You do not have access to this resource | Optional |
| 404 | All | The requested resource does not exist, or you are not authorised to access it | No |
| 405 | All | The method used is not allowed | No |
| 409 | PUT, DELETE | The request was not processed because of a concurrency issue, most commonly the 'If-Match' header was required but not provided | Optional |
| 412 | PUT, DELETE | The request was not processed because a 'If-Match' request header condition was not met, see concurrency) | Optional |
| 500 | All | An internal error occurred | Required |
| 503 | All | The API is temporarily unavailable | No |
Concurrency
To prevent concurrency issues when updating or deleting resources an If-Match
header is expected on the request, which should be set to the current version of the resource.
The resource version is provided in the ETag
header on a GET request.
If a request to update or delete a concurrency-controlled resource does not contain a If-Match
header a 409 status code will be returned. If the header is provided and does not match the
latest version a 412 status code is returned.
Errors
API Requests may result in an error, either due to an invalid request or because of an internal error.
When this happens the status code of the response will indicate the nature of the error and the response may contain error messages describing the error(s).
Error messages may contain the following attributes:
- id: In the case of an internal error (500) this is a unique identifier for the exception occurrence, otherwise it's a code for the type of error.
- text: A localised description of the error
- object: If the source of the error is a data attribute on the request, this points to the attribute(s) (not applicable to internal errors)
See the example below showing a set of errors that have been returned from an invalid request to update the fictional insurance resource.
{
  "msg": {
    "error": [
      {
        "id": "0037INSVALIDFROM",
        "object": [
          "insurance.validFrom",
          "insurance.validTo"
        ],
        "text": "Insurance 'Valid from' must be before the 'Valid to' date"
      },
      {
        "id": "0013NOPERSON",
        "text": "The person related to this record does not exist"
      }
    ]
  },
  "meta": {
    "links": {
      "self": {
        "href": "insurance"
      }
    }
  }
}
Pagination
Collections of resources may be paginated; these collections provide additional meta data and hypermedia links allowing the navigation of the paginated set.
The additional links provided are:
- first: the first page of data
- last: the last page of data
- prev: the previous page of data
- next: the next page of data
The additional meta data attributes provided are:
- totalPages: the total number of pages in the set
- pageNumber: the current page number
- pageSize: the number of resources returned per page
- maxPageSize: the maximum number of resources that can be requested on a page
- count: the total number of resources in the set
The following query string parameters can be provided to control the pagination of the returned results:
- page[offset]: The page index to return (zero indexed)
- page[limit]: The number of resources to return per page
Example of a paginated collection:
{
  "data": {
    "people": [
      {
        "id": "031c0575-ed2e-4e04-bd01-cc7565045d8b",
        "type": "person",
        "firstName": "Susan",
        "lastName": "Smith",
        "_links": {
          "self": {
            "href": "people/031c0575-ed2e-4e04-bd01-cc7565045d8b"
          }
        }
      },{
        "id": "80e3ef54-2905-42f7-87ac-eaaed55df144",
        "type": "person",
        "firstName": "David",
        "lastName": "Jones",
        "_links": {
          "self": {
            "href": "people/80e3ef54-2905-42f7-87ac-eaaed55df144"
          }
        }
      }
    ]
  },
  "meta": {
    "totalPages": 5,
    "pageNumber": 2,
    "pageSize": 2,
    "maxPageSize": 100,
    "count": 10,
    "links": {
      "self": {
        "href": "people"
      },
      "next": {
        "href": "people?page%5Boffset%5D=4&page%5Blimit%5D=2"
      },
      "prev": {
        "href": "people?page%5Boffset%5D=0&page%5Blimit%5D=2"
      },
      "last": {
        "href": "people?page%5Boffset%5D=8&page%5Blimit%5D=2"
      },
      "first": {
        "href": "people?page%5Boffset%5D=0&page%5Blimit%5D=2"
      }
    }
  }
}
HATEOAS
What is HATEOAS?
HATEOAS stands for Hypermedia As The Engine Of Application State. HATEOAS is an architectural constraint of REST based APIs whereby in response to requests from the client the server provides not only resource data, but also hyperlinks which allow the client to dynamically traverse various related resources kept on the API server merely by association.
What benefit does HATEOAS provide?
HATEOAS can make a REST application self discoverable by the consumer, meaning the consumer need only know a single fixed entry URI and thereby the hypermedia links provided dynamically by each subsequent response should allow any and all resources provided by the REST application to be discoverable by traversing the associated links. These restrictions imposed by HATEOAS decouple the client and server meaning that both the frontend and backend designs can evolve independently and allow for much better scalability. HATEOAS also applies a standardised design to the REST application meaning there is little to no need for documentation.
What kind of hypermedia links are provided by People First API responses? and how can these be utilised by PF API integrators?
If you haven't yet read through this websites quick start guides for authentication and first API calls then click here and read those first. It will give you a better understanding of this section and its applications.
Within the guide you will have sent a request to the People First APIs for 'Create Person', the example response object can be viewed below and its full content can be fully accessed by the using the scroll bar to the right-hand side of the viewing window:
{
    "meta": {
        "links": {
            "self": {
                "href": "/hrm/people"
            }
        },
        "person.personalReference": {
            "disabled": "true"
        },
        "person.lastName": {
            "mandatory": "true"
        },
        "person.firstName": {
            "mandatory": "true"
        },
        "person.title": {
            "mandatory": "true",
            "values": [
                {
                    "value": "Mr",
                    "id": "9e188b9d-737b-4c9d-92bb-199d8a6fba5c",
                    "code": "TITLE0001"
                }
            ]
        },
        "person.socialSecurityNumbers": {
            "mandatory": "true"
        },
        "person.socialSecurityNumbers.legislation": {
            "mandatory": "true",
            "values": [
                {
                    "value": "United Kingdom",
                    "id": "47c23873-057b-4b22-b2d9-a1a31ccec3fb",
                    "code": "UK"
                }
            ]
        },
        "person.socialSecurityNumbers.socialSecurityNumber": {
            "mandatory": "true"
        },
        "person.startDate": {
            "disabled": "true",
            "hidden": "true"
        }
    },
    "data": {
        "person": {
            "_links": {
                "createBannerImage": {
                    "href": "/hrm/people/7c24544e-2b36-495f-91b6-aeba007316a4/bannerimage/resourcetemplate"
                },
                "disabilityInformation": {
                    "href": "/hrm/people/7c24544e-2b36-495f-91b6-aeba007316a4/disabilityinformation"
                },
                "sensitiveInformation": {
                    "href": "/hrm/people/7c24544e-2b36-495f-91b6-aeba007316a4/sensitiveinformation"
                },
                "team": {
                    "href": "/hrm/people/7c24544e-2b36-495f-91b6-aeba007316a4/team?page%5BLimit%5D=10&page%5BOffset%5D=0"
                },
                "teamPeople": {
                    "href": "/hrm/people/7c24544e-2b36-495f-91b6-aeba007316a4/team/people?page%5BLimit%5D=10&page%5BOffset%5D=0"
                },
                "photoUpload": {
                    "href": "/hrm/people/7c24544e-2b36-495f-91b6-aeba007316a4/photo"
                },
                "attachments": {
                    "href": "/hrm/people/7c24544e-2b36-495f-91b6-aeba007316a4/attachments",
                    "template": "/hrm/people/7c24544e-2b36-495f-91b6-aeba007316a4/attachments/resourcetemplate"
                },
                "notes": {
                    "href": "/hrm/people/7c24544e-2b36-495f-91b6-aeba007316a4/notes",
                    "template": "/hrm/people/7c24544e-2b36-495f-91b6-aeba007316a4/notes/resourcetemplate"
                },
                "events": {
                    "href": "/hrm/people/7c24544e-2b36-495f-91b6-aeba007316a4/events"
                },
                "absenceTypes": {
                    "href": "/hrm/people/7c24544e-2b36-495f-91b6-aeba007316a4/absencetypes"
                },
                "contacts": {
                    "href": "/hrm/people/7c24544e-2b36-495f-91b6-aeba007316a4/contactinfo"
                },
                "absenceDisabledPeriods": {
                    "href": "/hrm/people/7c24544e-2b36-495f-91b6-aeba007316a4/globalAbsenceDisabledPeriods"
                },
                "createHolidayAbsence": {
                    "href": "/hrm/people/7c24544e-2b36-495f-91b6-aeba007316a4/absences/absencetypes/c7a9ef1a-69a3-4cf6-bd82-67a34d3a9c2d/resourcetemplate"
                },
                "createSicknessAbsence": {
                    "href": "/hrm/people/7c24544e-2b36-495f-91b6-aeba007316a4/absences/absencetypes/31467a35-a27b-45dd-be22-629816d9aa93/resourcetemplate"
                },
                "transfer": {
                    "href": "/hrm/people/7c24544e-2b36-495f-91b6-aeba007316a4/transferrequest/resourcetemplate"
                },
                "startOccupancy": {
                    "href": "/hrm/people/7c24544e-2b36-495f-91b6-aeba007316a4/occupancies/resourcetemplate"
                },
                "rightToWork": {
                    "href": "/hrm/people/7c24544e-2b36-495f-91b6-aeba007316a4/righttowork"
                },
                "passports": {
                    "href": "/hrm/people/7c24544e-2b36-495f-91b6-aeba007316a4/passports"
                },
                "residencyPermits": {
                    "href": "/hrm/people/7c24544e-2b36-495f-91b6-aeba007316a4/residencyPermits"
                },
                "emergencyContacts": {
                    "href": "/hrm/people/7c24544e-2b36-495f-91b6-aeba007316a4/emergencyContacts"
                },
                "createEmergencyContacts": {
                    "href": "/hrm/people/7c24544e-2b36-495f-91b6-aeba007316a4/friendsfamily/resourcetemplate"
                },
                "friendsFamily": {
                    "href": "/hrm/people/7c24544e-2b36-495f-91b6-aeba007316a4/friendsfamily"
                },
                "createFriendsFamily": {
                    "href": "/hrm/people/7c24544e-2b36-495f-91b6-aeba007316a4/friendsfamily/resourcetemplate"
                },
                "drivers": {
                    "href": "/hrm/people/7c24544e-2b36-495f-91b6-aeba007316a4/drivers"
                },
                "createDrivers": {
                    "href": "/hrm/people/7c24544e-2b36-495f-91b6-aeba007316a4/drivers/resourcetemplate"
                },
                "visas": {
                    "href": "/hrm/people/7c24544e-2b36-495f-91b6-aeba007316a4/visas"
                },
                "address": {
                    "href": "/hrm/people/7c24544e-2b36-495f-91b6-aeba007316a4/address"
                },
                "createAddress": {
                    "href": "/hrm/people/7c24544e-2b36-495f-91b6-aeba007316a4/address"
                },
                "peers": {
                    "href": "/hrm/people/7c24544e-2b36-495f-91b6-aeba007316a4/peers?page%5BLimit%5D=10&page%5BOffset%5D=0"
                },
                "personStatement": {
                    "href": "/hrm/people/7c24544e-2b36-495f-91b6-aeba007316a4/statement"
                },
                "editPersonStatement": {
                    "href": "/hrm/people/7c24544e-2b36-495f-91b6-aeba007316a4/statement"
                },
                "personManagerStatement": {
                    "href": "/hrm/people/7c24544e-2b36-495f-91b6-aeba007316a4/managerstatement"
                },
                "publicHolidays": {
                    "href": "/hrm/people/7c24544e-2b36-495f-91b6-aeba007316a4/publicholidays"
                },
                "employmentPeriods": {
                    "href": "/hrm/people/7c24544e-2b36-495f-91b6-aeba007316a4/employmentperiods"
                },
                "occupancies": {
                    "href": "/hrm/people/7c24544e-2b36-495f-91b6-aeba007316a4/occupancies"
                },
                "bankAccounts": {
                    "href": "/hrm/people/7c24544e-2b36-495f-91b6-aeba007316a4/bankaccounts"
                },
                "absenceProfile": {
                    "href": "/hrm/people/7c24544e-2b36-495f-91b6-aeba007316a4/absenceProfile"
                },
                "outOfOffice": {
                    "href": "/hrm/people/7c24544e-2b36-495f-91b6-aeba007316a4/colleagues/outofoffice"
                },
                "outOfOfficePeers": {
                    "href": "/hrm/people/7c24544e-2b36-495f-91b6-aeba007316a4/outofoffice/peers"
                },
                "outOfOfficeManagers": {
                    "href": "/hrm/people/7c24544e-2b36-495f-91b6-aeba007316a4/outofoffice/managers"
                },
                "employmentProfile": {
                    "href": "/hrm/people/7c24544e-2b36-495f-91b6-aeba007316a4/employmentProfile"
                },
                "employmentStatus": {
                    "href": "/hrm/people/7c24544e-2b36-495f-91b6-aeba007316a4/employmentstatus"
                },
                "editLeaveAllowance": {
                    "href": "/hrm/people/7c24544e-2b36-495f-91b6-aeba007316a4/absenceallowancedetails/effdate/2022-06-20"
                },
                "patternSchedule": {
                    "href": "/hrm/people/7c24544e-2b36-495f-91b6-aeba007316a4/patterntype/WP/schedule"
                },
                "absenceAllowanceScheme": {
                    "href": "/hrm/people/7c24544e-2b36-495f-91b6-aeba007316a4/absenceAllowanceScheme/effdate/2022-06-20"
                },
                "certificateOfSponsorships": {
                    "href": "/hrm/people/7c24544e-2b36-495f-91b6-aeba007316a4/sponsorshipcertificates"
                },
                "workPermits": {
                    "href": "/hrm/people/7c24544e-2b36-495f-91b6-aeba007316a4/workpermits"
                },
                "settlementStatuses": {
                    "href": "/hrm/people/7c24544e-2b36-495f-91b6-aeba007316a4/settlementstatuses"
                },
                "leaveOccupancy": {
                    "href": "/hrm/employmentperiods/38596d64-11c4-4525-9953-aeba007316d8"
                },
                "personSignatureHeld": {
                    "href": "/hrm/people/7c24544e-2b36-495f-91b6-aeba007316a4/signatureheld"
                },
                "self": {
                    "href": "/hrm/people/7c24544e-2b36-495f-91b6-aeba007316a4"
                }
            },
            "personId": "7c24544e-2b36-495f-91b6-aeba007316a4",
            "firstName": "Edward",
            "lastName": "Norton",
            "title": "9e188b9d-737b-4c9d-92bb-199d8a6fba5c",
            "otherNames": "",
            "knownAs": "Edward",
            "pronouns": "",
            "previousLastName": "",
            "startDate": "2022-06-01",
            "personalReference": "A07",
            "socialSecurityNumbers": [
                {
                    "legislation": "47c23873-057b-4b22-b2d9-a1a31ccec3fb",
                    "socialSecurityNumber": "AB123457A",
                    "_status": "est"
                }
            ]
        }
    }
}
This JSON response object contains two initial member objects which are 'meta' and 'data'. The data object, as the name suggests, contains the response data relating to the request which called it. In this case we have made a request to create a person with the relevant data attached in the body, the person has been created by the functionality of the API then saved within the relevant database and then the response object has been returned to the client.
From the initial Create Person response object we are going to traverse a couple of the hypermedia links using the Postman requests which were used in the quick start guide referenced above (Making first call to People First API), as well as some of our own in order to demonstrate the HATEOAS principal using the People First APIs.
  "createDrivers": {
    "href": "/hrm/people/7c24544e-2b36-495f-91b6-aeba007316a4/drivers/resourcetemplate"
  },
For this HATEOAS demonstration we shall be adding Drivers Details to the example Person (Edward Norton) as per the above response object. When we created our person we needed a resource template in order to provide the structure for our request body object. We will also require a 'Create Drivers Resource Template' to again provide the structure for our next request. If we were to use Dot Notation on the above response object to locate the required URI path for our request then the JSON object path would be 'x.data.person._links.createDrivers.href'. This will locate the href property in the above object called "createDrivers".
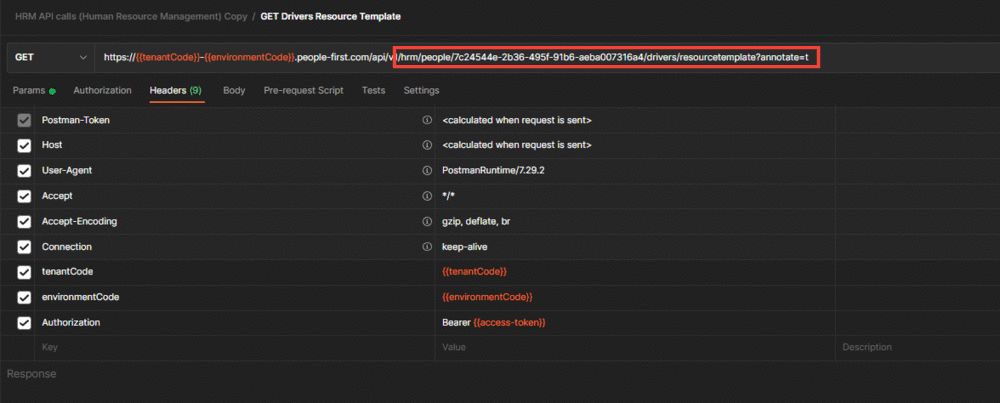
We then copy our URI path value from the 'href' key and paste it into a new Postman 'GET' request immediately after the People First base URI as indicated above. Make sure your 'access-token' is valid, hasn't expired and is inserted as a header within the request, as per the quick start guide demonstration. Everything is now in place, so hit send.
{
    "meta": {
        "links": {
            "self": {
                "href": "/hrm/people/7c24544e-2b36-495f-91b6-aeba007316a4/drivers/resourcetemplate"
            }
        }
    },
    "data": {
        "persondrivers": {
            "_links": {
                "create": {
                    "href":  "/hrm/people/7c24544e-2b36-495f-91b6-aeba007316a4/drivers"
                }
            },
            "countryId": "",
            "dateVerified": "",
            "disqualificationEndDate": "",
            "disqualificationStartDate": "",
            "isCurrentlyDisqualified": false,
            "licenceNumber": "",
            "carRegistrationNumber": "",
            "documentDiscriminator": "",
            "issuingStateId": "",
            "nameOnLicence": "",
            "validFrom": "",
            "validTo": "",
            "insuranceDateVerified": "",
            "insuranceValidFrom": "",
            "insuranceValidTo": "",
            "internationalDrivingPermitType": "",
            "internationalDrivingPermitExpiryDate": ""
        }
    }
}
The resource template required for adding driver details for our person can be seen above within the 'data' object, which is nested within the resource template response object. The object is called "persondrivers" (object name highlighted in blue). The response also contains a hyperlink for our next action to create the driver details (hyperlink highlighted in red).
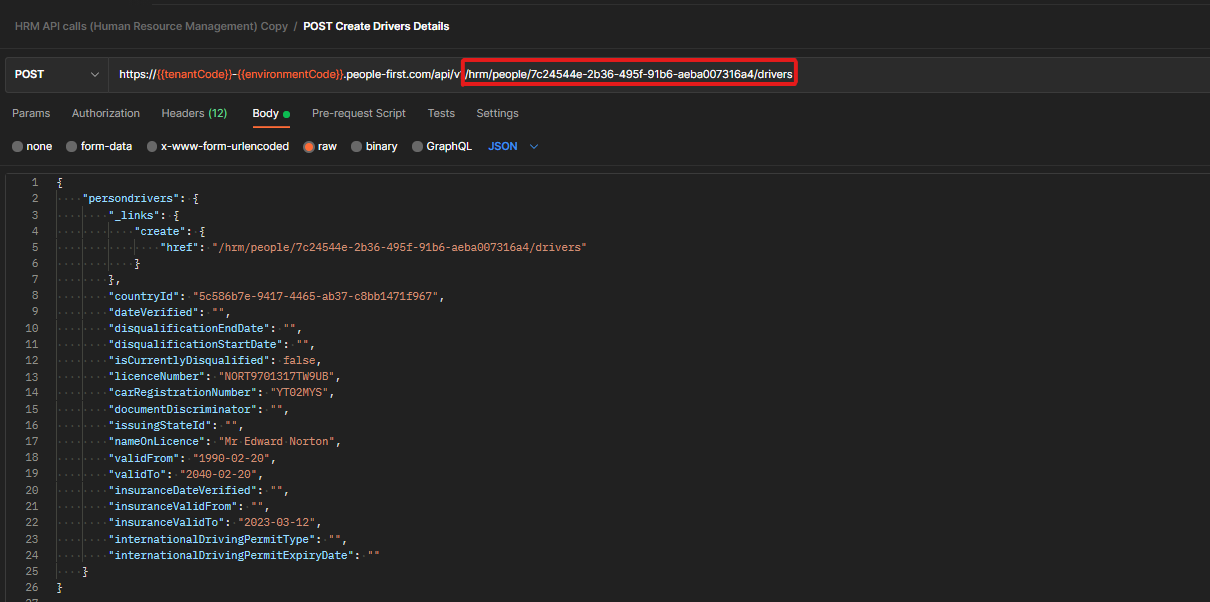
As we did with our previous request copy the URI path value from within the last response body received in reaction to the 'Drivers Details Resource Template'. The URI path is highlighted in red above. Paste the URI path value onto the end of your own People First base URI in a new Postman 'POST' request as indicated in the image above. As before ensure that your 'access-token' is valid and that your tenant / environment codes are correct.
Within your request, select 'Body' from the tabs below the request URI, and then click the 'raw' radio button then select 'JSON' from the dropdown menu at the end of the row. Extract the driver details resource template from the resource template response object and paste it into your Postman request body as demonstrated in the example above. Switch out the demo driver details for your details you wish to create. The fields which have been filled in are mandatory, so cannot be left blank. When you have completed all the details hit send.
{
    "meta": {
        "links": {
            "self": {
                "href": "/hrm/people/7c24544e-2b36-495f-91b6-aeba007316a4/drivers"
            }
        },
        "persondrivers.countryId": {
            "values": [
                {
                    "value": "United Kingdom",
                    "id": "5c586b7e-9417-4465-ab37-c8bb1471f967",
                    "code": "GBR"
                }
            ]
        }
    },
    "data": {
        "persondrivers": {
            "_links": {
                "self": {
                    "href": "/hrm/persondrivers/0c7cf253-5415-47dd-9399-aee500850a68"
                },
                "attachments": {
                    "href": "/hrm/persondrivers/0c7cf253-5415-47dd-9399-aee500850a68/attachments",
                    "template": "/hrm/persondrivers/0c7cf253-5415-47dd-9399-aee500850a68/attachments/resourcetemplate"
                }
            },
            "driverId": "0c7cf253-5415-47dd-9399-aee500850a68",
            "countryId": "5c586b7e-9417-4465-ab37-c8bb1471f967",
            "dateVerified": "",
            "disqualificationEndDate": "",
            "disqualificationStartDate": "",
            "isCurrentlyDisqualified": false,
            "licenceNumber": "NORT9701317TW9UB",
            "nameOnLicence": "Mr Edward Norton",
            "carRegistrationNumber": "YT02MYS",
            "documentDiscriminator": "",
            "issuingStateId": "",
            "personId": "7c24544e-2b36-495f-91b6-aeba007316a4",
            "validFrom": "1990-02-20",
            "validTo": "2040-02-20",
            "insuranceDateVerified": "",
            "insuranceValidFrom": "",
            "insuranceValidTo": "2023-03-12",
            "internationalDrivingPermitType": "",
            "internationalDrivingPermitExpiryDate": ""
        }
    }
}
Our example response can be seen in the above code extract. We can see that as well as returning the successfully created drivers details further hyperlinks have been returned to carry out further actions in relation to 'attachments' (highlighted in red). This brings the demonstration aspect an end. You should now have enough information to explore different resources using the People First APIs.
In this demonstration we have applied the basic principles of HATEOAS to the People First APIs. This has allowed us to explore different resources by traversing from one resource to another purely by using the hyperlinks provided in the response objects returned from the current PF API request.
Resource Templates
Introduction
The aim of this section of the API documentation is to explain the concept of a Resource Template. Before explaining what a Resource Template is in the context of the People First APIs let's first break this term down to understand its meaning and application.
What is a REST Resource?
A REST Resource can be almost any content which is returned from a REST application in response to an API endpoint request. A resource could be any of the follow formats:
- Image
- Video
- HTML file or extract
- XML object
- JSON object
Resources returned from PF API endpoints will nearly always be JSON objects containing information retrieved from the PF API Databases.
What is a Template?
A template can be best described as a blueprint or design that provides a pre-determined structure, layout and / or style.
What is a Resource Template? and what are they used for?
A resource template is a blank version of a resource, which also provides the structure and layout of that resource. This is provided to the client to fill in and post back to create a new resource. Below is an example of a resource template to create a person. This example is in JSON format and is provided with all the fields blank bar a few which are auto-populated by the PF APIs.
{
  "person": {
    "_links": {},
    "firstName": "",
    "lastName": "",
    "title": "",
    "otherNames": "",
    "knownAs": "",
    "pronouns": "",
    "previousLastName": "",
    "startDate": "2022-06-01",
    "personalReference": "",
    "socialSecurityNumbers": [
      {
        "legislation": "47c23873-057b-4b22-b2d9-a1a31ccec3fb",
        "socialSecurityNumber": "",
        "_status": "new"
      }
    ]
  }
}
Metadata
What is Metadata?
Metadata is data that describes other data, but does not form part of the data it is describing. A simple example of this is the information that is displayed when you right-click on a file and select 'properties'. The properties view displays information such as the type of file, which application the file opens with, the size of the file and when it was created.
How is metadata utilised with People First APIs?
Let's take a look at one of the example requests which was the first to be carried out in the 'Quick Start Guide'. You don't have to have read the quick start guide in order to understand this explanation.
Displayed below is the 'data' element from the 'Create Person Resource Template' response object. The response object is made up of two child objects, 'data' and 'metadata', which can have further nested child objects or fields within them. The 'person' object within the 'data' object is what forms the actual resource template.
This resource template is a blank version of the resource which is ready to be populated with a person's data / info. These fields are pre-labelled to guide the user / client on what should go in the field e.g. 'firstName', 'lastName' and 'title'. Most of the fields are pretty intuitively labelled in order to guide the user as to what kind of information should be entered into the field, however what about the field labelled 'legislation'? It's not immediately obvious exactly what should be entered into this field to satisfy the criteria. This is where metadata comes in.
{
    "data": {
        "person": {
            "_links": {},
            "firstName": "",
            "lastName": "",
            "title": "",
            "otherNames": "",
            "knownAs": "",
            "pronouns": "",
            "previousLastName": "",
            "startDate": "",
            "personalReference": "",
            "socialSecurityNumbers": [
                {
                    "legislation": "",
                    "socialSecurityNumber": "",
                    "_status": "new"
                }
            ]
        }
    }
}
Displayed below is the 'metdata' part of the response object for 'Create Person Resource Template'. If we scroll down the metadata object about half way we can see the metadata nested object which relates to the 'legislation' field highlighted in red. This object provides information on which values can be entered into the legislation field. The first thing to note is that the field 'mandatory' has a value of 'true' meaning that this field cannot be left empty, whereas other fields where the value is 'false' can be left empty. Looking through the values array it is now easy to realise that 'legislation' is in reference to a country's legislation. For the purposes of this example we will be choosing the legislation of the 'United Kingdom', so we populate the legislation field with the 'id' within the 'United Kingdom' object ('47c23873-057b-4b22-b2d9-a1a31ccec3fb') and that field is then complete with valid information.
{
    "meta": {
        "links": {
            "self": {
                "href": "/hrm/people/resourcetemplate?annotate=t"
            }
        },
        "person.personalReference": {
            "hidden": "true",
            "disabled": "true"
        },
        "person.startDate": {
            "mandatory": "true"
        },
        "person.lastName": {
            "mandatory": "true"
        },
        "person.firstName": {
            "mandatory": "true"
        },
        "person.title": {
            "mandatory": "true",
            "values": [
                {
                    "value": "Dr",
                    "id": "cf14f246-385f-4fb3-b90f-a1254ef5520e",
                    "code": "TITLE0006"
                },
                {
                    "value": "Miss",
                    "id": "5175ae20-63d7-48e3-824d-72d35d1e960c",
                    "code": "TITLE0004"
                },
                {
                    "value": "Mr",
                    "id": "9e188b9d-737b-4c9d-92bb-199d8a6fba5c",
                    "code": "TITLE0001"
                },
                {
                    "value": "Mrs",
                    "id": "930fe73a-c2d5-446c-9819-75823d4fd7fe",
                    "code": "TITLE0005"
                },
                {
                    "value": "Ms",
                    "id": "77165d3e-aebb-41fd-891e-5fc7ce169ace",
                    "code": "TITLE0003"
                },
                {
                    "value": "Professor",
                    "id": "1a564fa5-4de3-4a6a-bca3-2869c20414eb",
                    "code": "TITLE0002"
                }
            ]
        },
        "person.socialSecurityNumbers": {
            "mandatory": "true",
            "links": {
                "template": {
                    "href": "/hrm/people/resourcetemplate?organisationId=00000000-0000-0000-0000-000000000000"
                }
            }
        },
            "person.socialSecurityNumbers.legislation": {
            "mandatory": "true",
            "values": [
                {
                    "value": "Isle of Man",
                    "id": "6895aa29-fe9d-4ee8-a349-91f19554677f",
                    "code": "IOM"
                },
                {
                    "value": "Malaysia",
                    "id": "96bf4445-11fe-4ab2-910e-a34101d3a00a",
                    "code": "MYS"
                },
                {
                    "value": "Other",
                    "id": "909e4ce5-9acd-44b7-9d21-a9f671f45f62",
                    "code": "OTHER"
                },
                {
                    "value": "Republic of Ireland",
                    "id": "9f1a256d-6a8e-4d59-b7a6-e7b4e9dae64e",
                    "code": "ROI"
                },
                {
                    "value": "Singapore",
                    "id": "630de51f-f7c8-407c-8439-201ee9bbb6ee",
                    "code": "SG"
                },
                {
                    "value": "States of Guernsey",
                    "id": "b98ef498-d2e7-4d50-871a-7313253ef007",
                    "code": "SOG"
                },
                {
                    "value": "States of Jersey",
                    "id": "c23f94c9-232e-4875-a9e4-84d9d4a1ab57",
                    "code": "SOJ"
                },
                {
                    "value": "United Kingdom",
                    "id": "47c23873-057b-4b22-b2d9-a1a31ccec3fb",
                    "code": "UK"
                },
                {
                    "value": "United States of America",
                    "id": "b1291fff-e37c-4323-a395-812cfd159395",
                    "code": "US"
                }
            ]
        },
        "person.socialSecurityNumbers.socialSecurityNumber": {
            "mandatory": "true"
        },
        "person.pronouns": {
            "values": [
                {
                    "value": "He/Him",
                    "id": "eefac58f-030e-419f-9bf0-4f454e79838d",
                    "code": "GP1"
                },
                {
                    "value": "She/Her",
                    "id": "6b43db2e-0de7-4238-870e-e0094afa1e49",
                    "code": "GP2"
                },
                {
                    "value": "They/Them",
                    "id": "cc0edab2-535c-4537-8fc9-68f95f077547",
                    "code": "GP3"
                }
            ]
        }
    }
}
This section of the API documentation relating to 'metadata' has provided a basic explanation as to what metadata is and how we can use it in relation to the People First APIs. Metadata can provide information about a particular data field, what info can be entered into that data field, and also if a data field is mandatory or not. The utility of metadata reaches even further than this section, and should be explored further in order to get the most from People First APIs.